Preparation of Positive and Negative Electrode Slurries
Let’s delve into how to use ultrasonic treatment equipment correctly and efficiently in the laboratory to assist in the preparation of positive and negative electrode slurries.
This is not just about simply “shaking” the slurry under ultrasound for a while, but a technology that requires comprehensive consideration of equipment selection, process parameters, and material characteristics.
Core objectives and advantages
The introduction of ultrasonic treatment in slurry preparation is mainly aimed at solving the problem of uniform dispersion of conductive agents (such as SP, CNTs, Graphene), thereby achieving:
1. Form a stable 3D conductive network: Thoroughly open the aggregates of the conductive agent, allowing them to fully and uniformly contact the active substance particles.
2. Improve slurry stability: A well dispersed slurry is less prone to settling and re aggregation, and has higher storage stability and coating consistency.
3. Optimize electrode performance: ultimately obtain electrodes with lower internal resistance, higher rate performance, and longer cycle life.
Types and selection of ultrasonic equipment
The laboratory mainly uses two types of ultrasonic equipment:
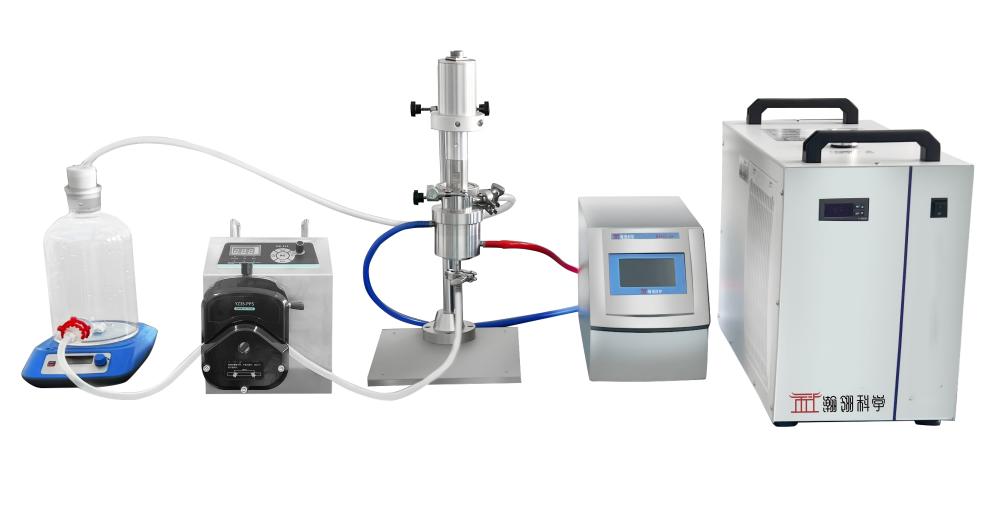
1. Probe type (ultrasonic cell grinder)
- Principle: The amplitude rod with titanium alloy probe is directly inserted into the slurry, and the energy is directly applied to the sample, with extremely high efficiency.
- Advantages: High energy density, short processing time, strong effect, suitable for processing high viscosity and difficult to disperse samples.
- Disadvantages:
*The sample size is limited: usually the processing capacity is between 50-500mL.
*Serious heat accumulation: A large amount of energy will be converted into thermal energy, which can easily cause a sharp increase in the temperature of solvents (such as NMP), requiring a matching ice water bath for cooling.
*Possible metal contamination: Prolonged operation of the probe may result in trace wear of the titanium alloy (usually negligible).
2. Bath type (ultrasonic cleaning machine)
- Principle: Place a container containing slurry into an ultrasonic water tank and transfer energy through an aqueous medium.
- Advantages:
*Mild processing, slow heating.
*Multiple samples can be processed simultaneously, with flexible sample sizes. - Disadvantages:
*Low energy density, long processing time, limited effectiveness for high viscosity slurries.
*Uneven energy distribution and “hot spots” in the sink require frequent movement of the container to ensure uniform treatment.
Suggestion for selection:
- For research and development as well as small batch preparation, the probe type ultrasonic processor is the preferred choice for pursuing the best dispersion effect, although strict temperature control is required.
- For pre treated conductive agent solutions or slurries with small processing volumes and low viscosity, bath type is more convenient.
Suggestions for Laboratory Standard Operating Procedures (SOP)
A typical slurry preparation process that integrates ultrasonic treatment is as follows (taking the most commonly used probe type as an example):
Step 1: Pre dispersion of conductive agent (key step)
1. Slowly add the weighed conductive agent (such as CNTs) into a portion of the solvent (NMP or deionized water), and use a magnetic stirrer to preliminarily wet and mix while adding.
2. Perform the first stage ultrasonic treatment on this mixture.
*Parameter setting: Adopt intermittent mode (such as working for 2-3 seconds, pausing for 1-2 seconds), and set the power to 40% -60% of the total power.
*Cooling: The beaker must be placed in an ice water bath to ensure that the temperature remains below 40 ℃ during the processing (especially for NMP systems).
*Time: Usually 3-10 minutes, until the mixture appears homogeneous and without obvious particles.
Step 2: Add adhesive
Add the pre dispersed conductive agent suspension to the dissolved binder solution (such as NMP solution of PVDF), and use a planetary mixer (Thinky Mixer) or mechanical mixer for medium speed mixing to preliminarily bond the conductive agent with the binder.
Step 3: Add the active substance
Add active substances (such as LFP, NMC, graphite, etc.) in batches and use a planetary mixer for high-speed shear stirring. The main purpose of this step is to mix the active substance particles evenly and wrap them with dispersed conductive agents and binders.
Step 4: Final homogenization and defoaming of the slurry
1. Stir at low speed under vacuum conditions to remove large bubbles from the slurry.
2. (Optional but recommended) Second stage ultrasonic treatment: For samples with extremely high requirements, a brief, low-power ultrasonic treatment (such as 20% -30% power, 1-2 minutes, strict ice bath) can be applied to the entire slurry at this time to further break down possible soft agglomeration and ensure ultimate uniformity. Attention: This step requires great caution as excessive ultrasound may damage the molecular chains of the binder or cause the active substance to break.
Key process parameters and precautions
1. Temperature control (of utmost importance!)
*NMP solvent: the boiling point is high (202 ℃), but the temperature rise will accelerate the swelling and crosslinking of PVDF binder, resulting in irreversible increase of slurry viscosity and even gel, which must be controlled below 50 ℃.
*Water based system: The problem of temperature rise is relatively small, but high temperature can accelerate volatilization and may cause other reactions.
*Solution: Always use ice water bath and adopt intermittent mode ultrasound.
2. Ultrasonic power and time
*The higher the power, the better: Excessive power can generate too much heat and strong shear force, which may damage the material structure (such as cutting short carbon nanotubes, damaging graphene structure) or damage the binder.
*The longer the time, the better: there exists an optimal time window. Lack of time and insufficient dispersion; Excessive time can lead to material damage, temperature runaway, and energy waste. It needs to be optimized through experiments.
3. Prevent pollution
*Ensure that the beakers and other containers used are clean.
*The titanium probe of the probe type ultrasonic instrument itself is corrosion-resistant, but after long-term use, check for wear and tear.
Effect evaluation
How to determine if ultrasound dispersion is in place?
1. Appearance observation: The well dispersed slurry is delicate, uniform, glossy, and free of visible particles or agglomerates.
2. Viscosity testing: Slurry with good dispersion usually has more stable viscosity and better flowability.
3. Coating inspection: The surface of the dried electrode film is uniform and free of black or white spots caused by the aggregation of conductive agents.
4. Performance testing: The ultimate resistance test of the chip (such as square resistance), the rate performance and cycling performance of the battery are the final inspection standards.
5. Microscopic characterization: SEM (scanning electron microscope) can visually observe the distribution of conductive agents on the surface of active substances.
Summary: In the laboratory, ultrasonic treatment is a powerful tool for preparing high-performance electrode slurries, but it must be operated with the same care as using precision instruments. By strict temperature control, optimized power/time parameters, and reasonable process design, the performance of electrode materials can be significantly improved, providing a solid guarantee for the reliability and repeatability of scientific research results.